Caregiver Tools
Download > Caregiver Tools User Guide ![]() (1MB)
(1MB)
Welcome
 Welcome to the new Caregiver Tools web portal. We have created a suite of tools to help you actively participate in the care of the subscriber.
This guide will help you get familiar with how the portal works and how to take advantage of all the features Caregiver Tools has to offer.
Caregiver Tools is available for all customers. Certain features may or may not be available depending on the service subscribed.
Features include automatic email and/or text message notifications and the ability to send a location request that searches for a Mobile Device’s current location, making it easier to care for a subscriber no matter how far away from them you are.
Overview
Caregiver Tools will allow you to be notified when an event happens, whether it is a system test or an actual emergency. You will also be able to get battery related alerts and locate a subscriber by searching for the Mobile Device’s location, assuming the user subscribed to a system which includes a Mobile Device. You can also customize your settings and chose which notifications you prefer to receive and how you want to receive these notifications: email, text message or both.
Caregiver Tools is intended to be accessed by a person who the user authorized. Every time you log in to the portal you will be asked to agree to the terms and conditions of use. This is to ensure you have been given permission by the user to access Caregiver Tools.
Once you are logged in and have accepted the terms and conditions, you will see the menu options to the left of your screen. Each of these menu options and all the features offered in this portal will be explained in this guide. Throughout the portal you will also find blue help buttons you can click to see definitions of the various terms used.

If you have any questions you can always contact our customer support team at 1-800-259-1234 and select the customer service option. Our office hours are Monday through Friday, from 8:00 AM to 5:00 PM CST.
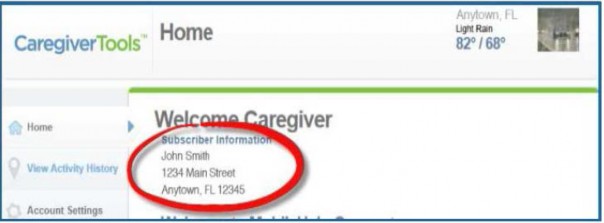
Home Page
On the home page you will find subscriber information, full name and address. This information is entered into the portal upon placing the order. If this information is no longer accurate, please have the subscriber call our customer support team to make changes.
In this page you will also find announcements and usage tips that will help you fully take advantage of all the new and existing features this portal offers.
View Activity History Page
Requires System with Mobile Device
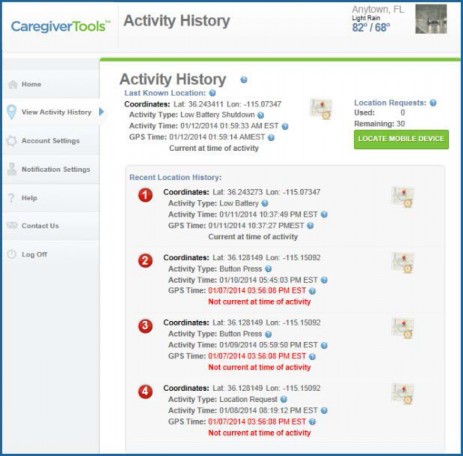
The “Locate Mobile Device” button in the top right corner of this page allows you to send a request for the current location of the Mobile Device if the subscriber received a Mobile Device with their system.
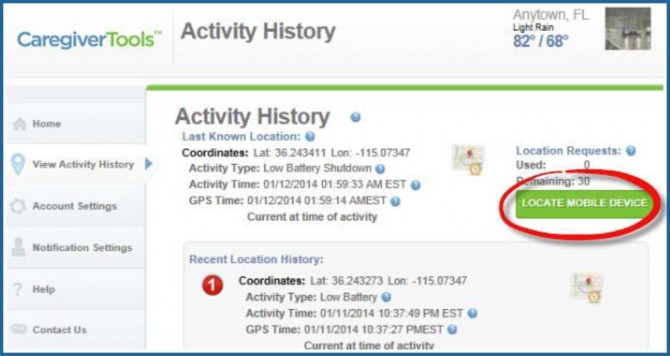
 Results may take up to five minutes in some cases and the success or accuracy depends on the current location and status of the Mobile Device. If you press this button, it will disappear while it searches for the device location. It can be up to
30 minutes for the button to reappear because the device might still be processing the last request. The button disappears to avoid multiple requests being sent at the same time which might increase the time it takes for the Mobile Device to respond.
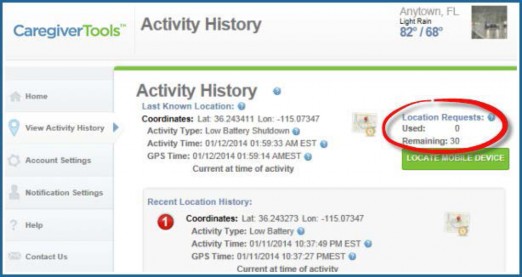
Right above the “Locate Mobile Device” button you will find Location Request information. You can see how many location requests you have used, how many you have left and when was the last location request sent.
Every time you press the “locate mobile device” button you use a location request. You will receive 30 location requests per month and your location requests expire at the end of every month. Location Requests are available to subscribers that have a system which includes a Mobile Device. If the user subscribed to a CLASSIC in home system and would like to upgrade to a Mobile system or if you need to add more location requests to your account you can do so by calling our customer support team at 1-800-259-1234 and select the customer service option. Our office hours are Monday through Friday, from 8:00 AM to 5:00 PM CST.
In the View Activity History page you will be able to see the last known location of the Mobile Device. The Mobile Device automatically attempts to obtain a GPS lock periodically throughout the day. Under the Last Known Location you will see the coordinates for the location of the Mobile Device at the time of the activity and the Activity Type (button press, location request, low battery or shut down). You will also find the Activity Time, which is the time the Mobile Device received the signal and the GPS Time which is the time the Mobile Device received the location information for this activity. The GPS time may vary from the Activity Time based upon the time the Mobile Device received a GPS lock. If it is within 10 minutes or less from the activity time it will be considered current, otherwise it will be considered not current and display red on your screen.
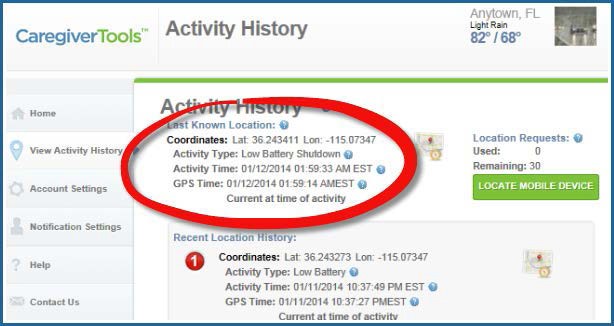
You will also find the recent location history, which is a list of the last four locations of the device listed from newest to oldest.
Account Settings Page
The Account Settings page allows the authorized user to change their login information. You will be able to view the subscriber’s billing information, but you will not be able to change it at this time. If you need to change billing information, please contact our customer support department.
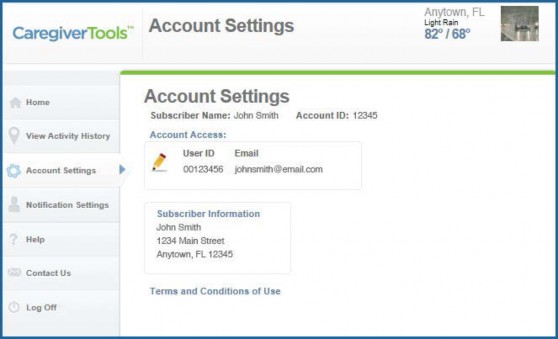
Caregiver Tools is intended to be accessed by a person who the user authorized. Upon activation an email is sent containing an account ID, a temporary password and an internet link to access the portal. The first time you log in to the portal you will be able to create a new password of your choosing. Your password must be at least 8 characters long, contain a number or special character, and a capital letter. You will receive an email and/or a text message confirming your new password.
Notification Settings Page
This page will allow you to control what notifications each notification responder will receive and in what way each responder will receive their notifications.
On the notification settings page you will see “Active Profile,” this is the current address we have on file for the subscriber along with the “Call List Responders” and the “Notification Responders” associated with this profile.
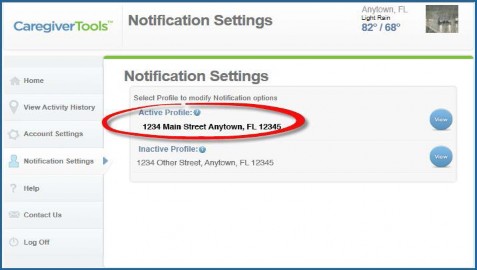
If the subscriber has multiple addresses or has moved, you might see “Inactive Profiles” listed on your account with different responders. If the subscriber has multiple addresses we recommend they notify customer support of the location change two weeks prior to moving so that they can update their “Active Profile” and their “Responders” if necessary.
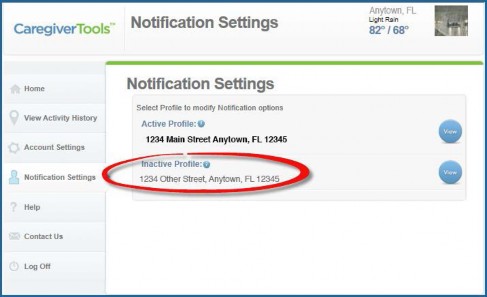
To see the responders associated with each profile, click on the round button that says “View” located to the right of your screen (see picture above.) Remember although you are able to see the list of “Call List Responders,” you can only change it by calling customer support.
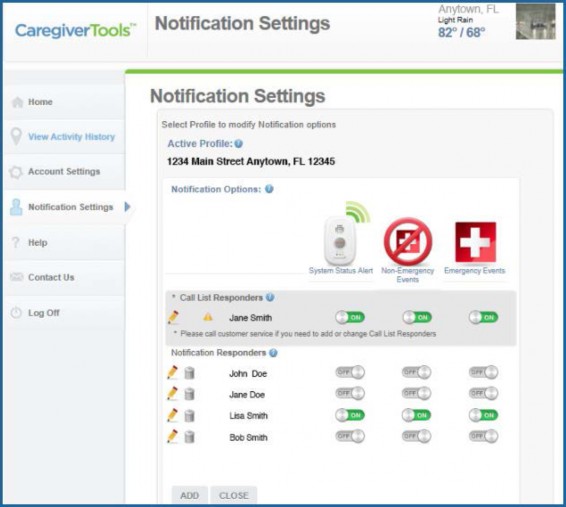
You can add “Notification Responders” by clicking on the “add” button to the bottom left corner of your screen.

Once you click this button, a box will open where you can fill in the name, email, and phone number for the responder and chose whether you want them to receive email notifications, text messages notifications or both.

 To edit Notification Responders information click on the pencil icon to the left of your screen. If you want to delete a responder click on the trash can icon.
You can have as many Notification Responders as you want listed on your account and you can choose for each responder to receive: System Status Alert Notifications, Non-Emergency Event Notifications, and Emergency Event Notifications via text message and/or email message.
Call List Responders listed in the subscriber’s emergency profile can also receive notifications. This would be set up by customer service.
Depending on what system the user subscribed to, Notification Responders and Call List Responders might get the following notifications via text and/or email:
System Status Alerts
 • The Mobile Device is low on battery
• The Mobile Device shut down due to 0 battery life
• The Cellular Base Station was disconnected from a power outlet
• The Cellular Base Station is low on battery
• The Cellular Base Station was re-connected to a power outlet or power was restored while in battery power mode
Non – Emergency Event
 • The user is doing a system test
• Help button was inadvertently pressed / false alarm
Emergency Event
 • Help has been dispatched (emergency help or call list responders, depending on the type of emergency and the user’s preferences listed in their security profile)
Medication Reminders
Requires Cellular Base Station
If you subscribed to the Medication Reminders service, please read the following instructions.
Scheduling Reminders
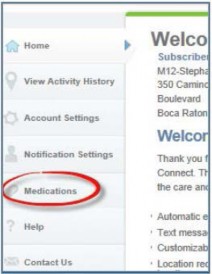
Click on the “Medications” tab to the left of your screen.
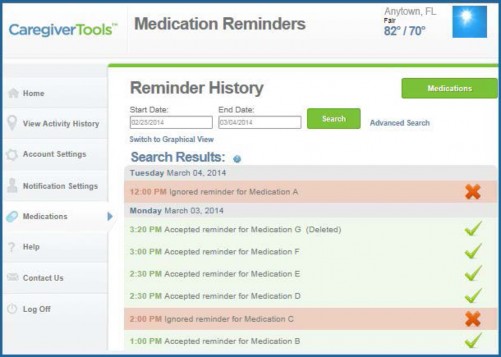
You will see the reminder history, which is a list of reminders that have been accepted or ignored by the user.
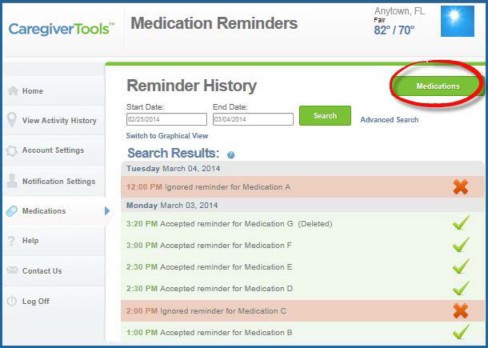
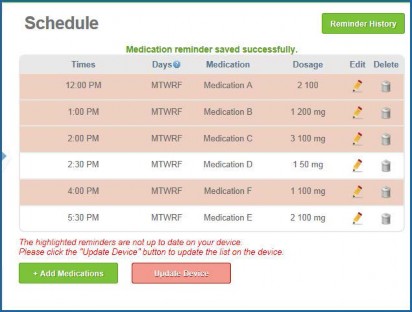
To schedule a new medication or view the list of medications for which reminders have been scheduled click on the “Medications” button on the top right corner of your screen.
Medications will be listed according to the time they are scheduled to be taken.
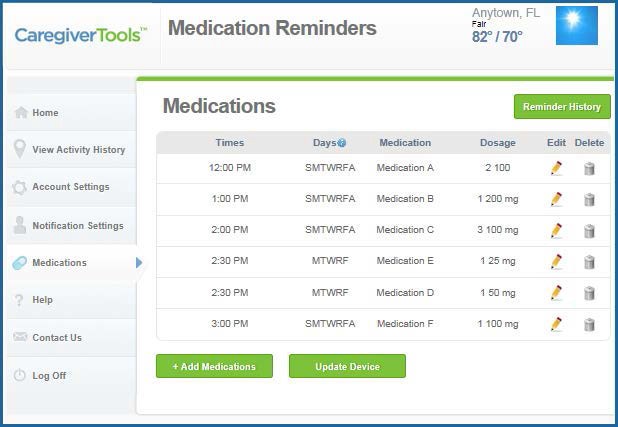
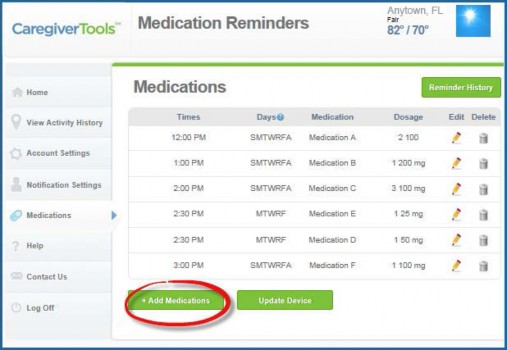
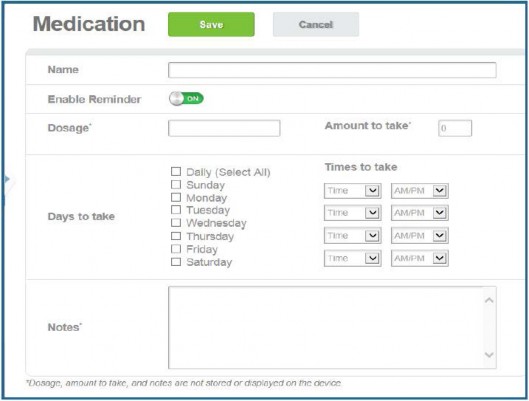
To add a new medication to the list, click on the “Add Medications” towards the bottom left corner of the page.
On the name field, please write the name of the medication.
The enable reminder button means that this specific medication is currently being taken by the user and a reminder is going to be sent through the Cellular Base Station. If you want to list a medication for which a reminder is not needed at the time just turn the reminder off and no message will be sent to the Cellular Base Station for this medication.
Enter the dosage, this information would be only for your records and will not be displayed on the Cellular Base Station screen when the reminder is being sent.
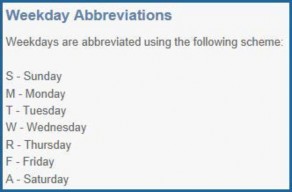
Please select the days when the medication has to be taken and select the time from the drop down menu. If you click on the help button next to “Days” you will see that the days are shown as follows:
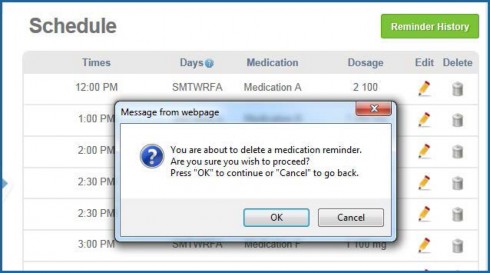
You can delete any medications by clicking on the trash can icon. If you do this, you will see a message asking you to confirm you want to delete this medication reminder. You can click OK to delete or Cancel to go back to the list of medications. If you click OK, the medication will be deleted from the list.
To change a medication dosage, schedule or name you can click on the pencil icon. Once you make the change, click to save. Again you will see a message asking you to confirm if you would like to proceed with the change, if you click OK the change will be saved. If you click Cancel your change will not be recorded.
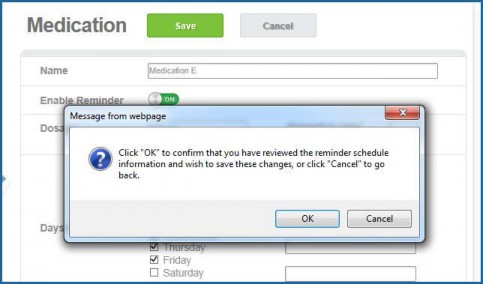
Finally press the save button on the top on the screen.
Important:
Every time you make a change or add a new medication the update device button will start flashing red. You will need to click on the update device button to sync the information you have in the portal with what is currently being sent to the Cellular Base Station. It will take up to five minutes for the Cellular Base Station to process the reminder list.
If an error message appears indicating the device failed to be updated, please call technical support at 1-800-259-1234.
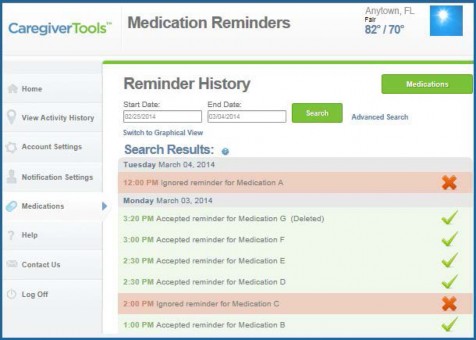
Reminder History
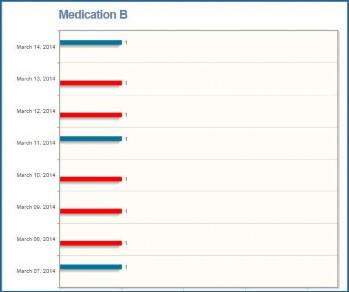
When you navigate to the Reminder History page, you will see that the accepted reminders are shown in green with a green check mark, and the ignored ones will be displayed in red with a red “X”.
Switch to graphical view will display the information on the reminder history on a bar graph.
To switch back to text, click on switch to text-based view.
Advanced search allows you to filter the information.
By selecting any medication from the list, you will see the reminder history for only that medication.
You can also search by deleted medications; these are medications that have been deleted from the list.
Inactive Reminders are medications that are on the list but are not currently being taken, so reminders have been turned off.
Basic search allows you to return to the regular view.
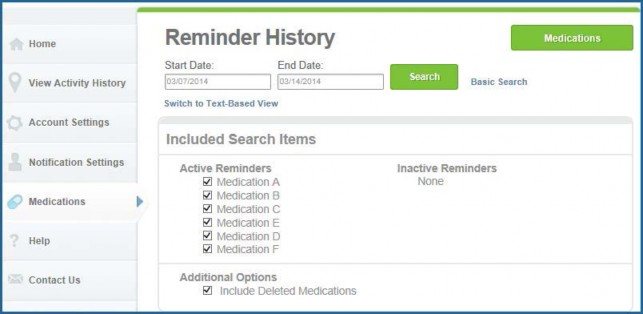
You can also view reminder history for a range of dates. For example if you only want to see the log only for January 2014, enter 01/01/2014 as your start date and 01/31/2014 as your end date and then click Search.
Medication Reminders User Experience
The name of the medication will be displayed on the Cellular Base Station screen just like it has been entered in the portal.
The Cellular Base Station will announce “Medication Reminder – Please Press Reset to Accept” once a minute for 30 minutes and the blue “reset” button will flash until “reset” button is pressed.
If the user presses the blue “reset” button the reminder will be recorded as accepted. If the user does not press the “reset” button within 30 minutes, the reminder will be recorded as ignored.
If you have any questions, please contact our customer support department at 1-800-259-1234.
Glossary of Terms
Active Profile – Current address we have on file for the subscriber and the Call List Responders and Notification Responders associated with this profile.
Activity History – Indicates the four most recent locations of the Mobile Device at the time of any activity (location request, button press, etc.)
Activity Time – Is the time that the activity signal was received by the Mobile Device.
Activity Type – The activity type indicates what type of signal was received by the Mobile Device. It can be a location request, button press, low battery, or shut down due to 0 battery life.
Automated Notifications – Users can receive notifications by email and/or text message to alert them about system status alerts, non-emergency, and emergency events.
Call List Responders – Are called by the central station operator in the event of an emergency that requires help to be dispatched. If Call List Responders were set up to receive email and/or text message notifications, they will receive these as well.
Emergency Event – Notifications indicating help has been dispatched. Help could be family member or paramedics depending on the situation and the preferences listed of the subscriber’s profile.
GPS Lock – When the Mobile Device receives latitude and longitude coordinates from the Global Positioning System.
GPS Time – Is the time the GPS coordinates were received by the Mobile Device. Current GPS time means the coordinates were obtained within 10 minutes or less from the time of the activity otherwise GPS time is not current and will be displayed in red. Please keep in mind the Mobile Device is best able to obtain a GPS lock when it has an unobstructed view of the sky, otherwise the GPS time may be displayed as not current.
Inactive Profile(s) – Other addresses that are associated with the subscriber’s account.
Last known location – The most recent GPS location data received from the Mobile Device.
Location Request – Used to identify the location of the subscriber. This can be accomplished by clicking on the “Locate Mobile Device” button, once you do this a location request is sent to the Mobile Device. The Mobile Device will then send back the latest location information. The location information will remain unchanged if the Mobile Device isn’t able to obtain an updated GPS position.
Non-emergency Event – Notifications that include system test and inadvertent button presses / false alarms.
Notification Responders – Are listed on your account to be notified when certain events happen.
System Status Alerts – Notifications relating to battery life on the Mobile Device and/or the Cellular Base Station, depending on the system selected.
If you need to make changes to the user’s profile, please have the user contact our customer service team at 1-800-259-1234 and select the customer service option. Our office hours are Monday through Friday, from 8:00 AM to 5:00 PM CST.